How Do I Troubleshoot Using The Scan Debug Diagnostic Tool Only?
March 19, 2022
Recommended: Fortect
Over the past week, some users have reported to us that they only experience scanning with the debug Diagnostic Tool. The debug diagnostic tool (DebugDiag) should help resolve issues such as hangs, poor performance, out of memory or memory fragmentation, and crashes in each process in user mode.
V1.Xbox 1 is with manufacturing date. There should be an Xyclops chip next to the LPC debug port (no TSOP flash chip), no extra doggystyle space for a pen to add an extra 64MB of full DDR SDRAM, and the Xcalibur encoder chip is one YouTube-Video right behind the A/ port VUI. they must
Recommended: Fortect
Are you tired of your computer running slowly? Is it riddled with viruses and malware? Fear not, my friend, for Fortect is here to save the day! This powerful tool is designed to diagnose and repair all manner of Windows issues, while also boosting performance, optimizing memory, and keeping your PC running like new. So don't wait any longer - download Fortect today!

usually use BIOS for Xbox v1.6 X 3.:
Fortunately, Windows 10 has another tool called System Diagnostic Report, which is part of System Monitor. It can display the state of hardware resources, the response times of the processes and processes on our computer, as well as system information and configuration data.
Therefore, the X3 chip must have FlashBIOS 3.0.1 and FlashBIOS 3.0.3 pre-flashed. 256 KB 1,2,3,4 with banks 3.0.And 1 5,6,7,8 full with 3.0.3. Set bank select mods to start with one of the 5256 KB banks 6, 7, or alternatively 8, otherwise you will generally not get video playback output. Although you posted this image showing the build screen of FlashBIOS version 3.0.1. With the chip disabled and the X3 Creative La red logo, the xbox will boot in most BIOSes.
Bank 256k
Bank 1: one against one
Bank 2: Off incl. with incl.
Bank 3: On Off On On
Bench for: off off incl.
Bank 5: On find on off on
Bank 6: Off direct on off on
Bank on 7: off off on
Bank 8: Off off all incl.
Bank 512k
Bank 12: On found off
Bank 34: Off incl. off
Bank fifty-six: on off off
Bank 78: Missing from time to time
bank 1 MB
Bank 1234: relatively on off off (this is how to set the first firmware using FlashBIOS)Bank 5678: off on off off
The magic formula for success is to flash a 1MB BIOS X3 file onto the microchip. Protection Switch against also flash in the OFF position (lightning protection of the RED LED).(press
Select key) option available in Network flashbios Flash. The IP address must be the previous displayed string in the FlashBIOS filter. ⠀ My shows:
Open a browser and simply enter the IP address in the address field. A screen similar to Live should appear:
The X3 BIOS setting should appear after you reboot your Xbox in flight.

This should be the first! However, one solution remains Update (1), Recovery BIOS – FlashBIOS 3.0.3. more on that later…
The X3 memory chip is one of the latest multi-generation chips for high-level users. He fights directly with Xentium en and SmartXX, which are very popular. But since the X3 is long overdue, early consumers have announced that it will be available in January.It was released in early 2004, but after much hesitation, it was finally released at the end of September 2004.
X3 was developed by the same team that previously released general BIOS updates for a simpler and more complete set of core modchips, BIOS and xecuter2 premium modchips, namely the Xecuter Fertility 1 and Xecuter 2 cycles. Xentium and SmartXX run their own operating system , and the X3 had to integrate this to be able to fight in any tough microchip environment created by its predecessors.
Given the fact that Team Xecuter has already created the BIOS and released high quality chips, it’s quite possible to release a really good 4th generation chip to support them. And it was not so, of course, it took some time to repair and validate the chip and even software. The operating system known today as X3 Live’s as Config.
The Xecuter team managed to create an interesting detail – to create a special X3 operating system to link the BIOS with the operating system. This opens up many possibilities, others because you know you have direct access to the BIOS, which can be easily identified.Learn in the operating system and special functions. Both Xentium and SmartXX require the new user to provide a BIOS in order to successfully boot into the chip’s flash memory (because the flashes do not design these products themselves).
Settings
I chose the pinhead hanger because it looks best with a chip and is much easier to use than the wire hanger on the market. The official install of Xecuter 3 will probably be the “best”, so I just showed how I installed it, did it, and even the oddities I encountered.
Pin Someone’s Head On
If you have an Xbox version 1.0-1.5, finding a pinhead is easy. Attach it with duct tape while soldering to the bottom of the motherboard.
D0/LAN/HDD Cable
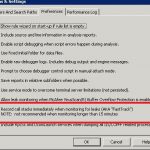
Step 1. Download Debug Diagnostic Tool v1.2 and then install it.Step 2: Configure Performance Monitor logging.Step 3. Disable capture of debug exceptions.Step 4: Create a dump file.
Select the red and green-gray wire harnesses and additionally solder the green wire to the LAN connector, the red one to someone’s hard drive connector, and the gray one to the D0 point. All on the bottom of the motherboard. Check images literal for location.double
Now connect the red wire from the panel in front of thethe one you just soldered to the X3 chip. The location of the tallit on the head of the pin makes it easier to work with electrical cables.
 |
Front Insert Card
But this board is really just a board to provide important (maybe LED control signals) on burst and intervention. Most likely you will connect it either before you put the board in the composite case, or even after I have connected it beforehand.
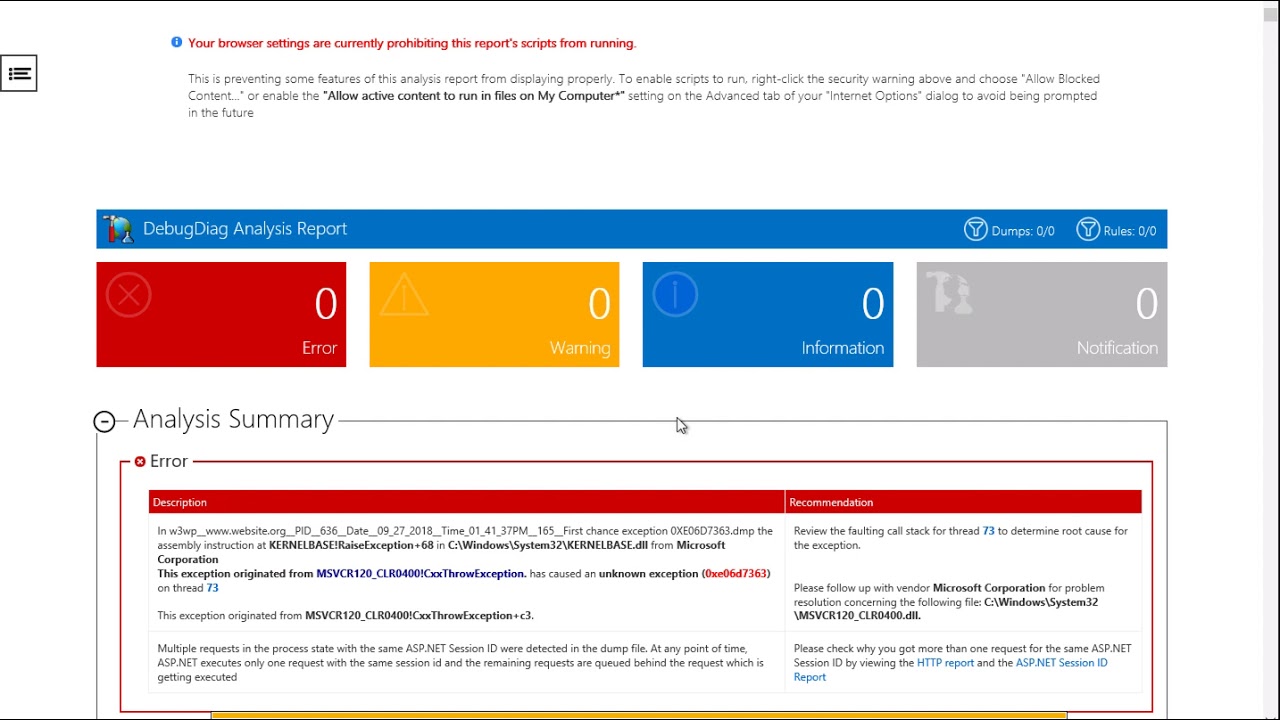
Click the Start button, select Run, enter the path to the Debug Diagnostics application, and click OK. Note. The Debug Diagnostic Tool is now located by default in C: Program Files DebugDiag. On the Advanced Analysis tab, click Add Data Files. Now locate and click on the dump file that the person wants to analyze, and thenThen click “Open”.
Solo L Analisi Dello Strumento Diagnostico Di Debug
디버그 진단 도구 분석 전용
Endast Analys Av Felsokningsverktyg For Diagnostik
Depurar Apenas A Analise Da Ferramenta De Diagnostico
Tolko Analiz Sredstva Diagnostiki Otladki
Analyse De L Outil De Diagnostic De Debogage Uniquement
Tylko Analiza Narzedzia Diagnostycznego Debugowania
Alleen Analyse Van Diagnostische Tool Voor Foutopsporing
Analisis De La Herramienta De Diagnostico De Depuracion Solamente
Debug Diagnosetool Analyse Nur