Corrective Action For Service Error 49.1 D03
December 12, 2021
If you see service error 49.1 d03, the following blog post will help you.
Recommended: Fortect
Go to our own Windows Start menu, select the Control Panel option, then double-click the system icon.Click the Hardware tab, then click the Device Manager button.
Microsoft Windows XP Home Edition Microsoft Windows XP Professional Windows Vista 5 Windows Windows 8.1 Windows ten
MicrosoftWindows XP Home Edition MicrosoftWindows XP Professional Windows Vista Windows 7 Windows 8.1 Windows 10
For Windows 8 and later: Search for “Device Manager” in the “Start” menu or select “Device Manager” in the quest results.
For Windows 7 and earlier: Type command after command and press ENTER:
Note. Before you discover any devices that are not connected, click on Show Hidden Devices in the View menu.neg ”in Device Manager to allow them to use your computer.
Also note on Windows 7: if you close the Tell Window prompt, Window will remove the offset from devmgr_show_nonpresent_devices = 1 set in step 9 and prevent ghost devices from appearing when you click Show Hidden Devices.
If you are a developer, also known as a power user, and want to make sure you can view devices that are unfortunately not connected to your netbook, set this environment variable globally:
Note. Use this method for troubleshooting and development purposes only, or to prevent operators from accidentally deleting required software that is not connected to this computer (such as a laptop).
In the device manager, in addition to all displayed devices, there are two types of hidden devices: Hidden
typical, unspecified devices (non-Plug and Play drivers, printers and therefore included)
Only one reinstall the device drivers under Windows XP.

IMPORTANT: This procedure must be performed when you are logged in as an administrator or with an account with administrator rights.
1. Click the “Start” button, then click “Control Panel”.
2. In Control Panel, under Select a Theme, double-click the Performance and Maintenance icon.
3. In the Performance and Maintenance window, double-click the image below or below the control panel image.
4. In the System Properties window we ‘click the’ General Hardware ‘tab.
5. On the “Hardware” tab, click in the device manager, click the “Device Manager” button.
6. In the Device Manager window, double-click the icon of each category for the device you want to remove.
7. In Device Manager, tap to select the accessory you want to remove.
8. In the “Water Point” menu, click “Action”.
9. In the “Action” menu, look “Delete”.
10. Confirm the removal of the device in the main window by clicking the OK button.
NOTE. This shows up on some devices. The operating system displays a window for changing system settings. Click Yes to restart your computer frequently.
11. Restart your computer.
NOTES:
– When most computers restart, the operating system also finds the device installation and usually the driver.
– If the corporate network cannot find the driver automatically, let the installation wizard locate the C: WINDOWS I386 folder.
From. Window. Office, click. Begin. > Control panel. … If you are using the classic Start menu, the visitor. Begin.Press. Performance and Service. … If the options differ from the basic example below, continue. Step by step. Instructions with classic display.Press. System. …On the Hardware tab, click.Device Manager. …
List of Sony Asia Pacific locations offering customer service
Recommended: Fortect
Are you tired of your computer running slowly? Is it riddled with viruses and malware? Fear not, my friend, for Fortect is here to save the day! This powerful tool is designed to diagnose and repair all manner of Windows issues, while also boosting performance, optimizing memory, and keeping your PC running like new. So don't wait any longer - download Fortect today!

IMPORTANT: This procedural trick must be performed when you log on again as an administrator or with a username and password with administrator rights.
1. Click “Start”, then click “Control Panel”.
2. In the Control Window, under Select by Category, double-click the Performance and Maintenance icon.
3. In the Performance and Maintenance window, under the selected control panel icon, double-click the System icon.
4. In the current System Properties window, click Hardware and select the tab.
5. Click the “Hardware” tab in the corresponding field of the device manager on the button “Device Manager”.
6. In the glass window of Device Manager, double-click the category icon for all the devices you want Pour.
7. Click the Peripherals -Manager category on the devices you want to remove.
8. In the recipe panel, click Action.
9. Click “Delete” on the d action menu. 10. In the confirmation window to delete the device, click OK.
NOTE. Some devices have the main part of the operating system, which must display a start window to change the settings. System settings. Click Yes to wake up the computer.
11. Restart your computer.
NOTES:
– When the computer restarts, all operations detect the installed device and the installed driver.
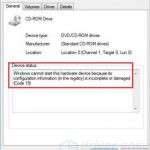
Some customers have reported that nothing appears in Device Manager. This can happen if one of the critical Windows servicing plans ends up disabled, or if the read / write access to the registry for the Device Manager key is corrupted.
– If the operating system cannot automatically detect the driver, ask the installation wizard to check the C: WINDOWS I386 folder.
List of Sony Asia Pacific Service Offices customer activities
List of Sony Asia Pacific locations that provide online after-sales service
Download this software and fix your PC in minutes.H1 Korrekturmassnahmen Fur Servicefehler 49 1 D03 H1 P P P P P P Wenn Sie Den Hilfefehler 49 1 D03 Sehen Hilft Ihnen Der Folgende Blogbeitrag P P Inc
49 1 D03 서비스 오류
49 1 Error De Servicio D03
49 1 D03 Erreur De Service
49 1 D03 Blad Serwisowy
49 1 D03 Erro De Servico
49 1 D03 Servicefel
49 1 D03 Servicefout
49 1 Oshibka Obsluzhivaniya D03
49 1 Errore Di Servizio D03