Alivenf6g-vsta-Update-BIOS Recovery Steps
October 31, 2021
You may have encountered an error code indicating a BIOS update from alivenf6g-vsta. It turns out that there are several ways to solve this problem, which we will talk about a little later.
Recommended: Fortect
We use cookies to make your experience more personal and convenient. By visiting this site you agree а the use of cookies. If you do not accept cookies or if you need more instructions, please read our privacy policy.
ALiveNF6G-VSTA
- Supports Socket AM2 + / AM2 CPU Chips: AMD Phenom ™ FX / vs. Phenom Athlon 64 FX / Athlon 64 X2, Dual Core / Athlon X2, Dual Core / Athlon 64 / Sempron Processor
- NVIDIA ® GeForce 6100 / nForce 430 or even GeForce 6150SE / nForce 430 chipset
- AMD LIVE! ™ Done
- Supports dual channel DDR2 1066/800/667/533 (4 DIMM slots), non-ECC, unbuffered memory, maximum capacity up to 16GB.
- ASRock AM2 Boost: ASRock To Science patent increases storage performance up to 12.5%.
- Integrated NVIDIA ® GeForce6 DX9.0 VGA, Pixel Shader 3.0, 256MB maximum shared memory
- 1 PCI Express x16 slot
- Unrelated overclocking: when overclocking, the FSB has much more freedom of action thanks to the fixed PCI-PCie / bus
- Hybrid Booster – ASRock Safe Overclocking Technology
- 4 Ports SATA2 3.0 Gbps, Sustain (RAID raid 0, RAID 1, RAID 0 + 1, RAID 5, JBOD), NCQ and other hot-swap functions.
- The HDMI_SPDIF header that is aboutProvides SPDIF audio output to HDMI VGA card account, allows the system to connect HDMI digital TVs / projectors / LCD devices.
- 7.1ch Vista ™ Windows ® HD High Level Audio (ALC888 Audio Codec), 10/100 Ethernet LAN
- Vista ™ Support Windows ® Premium Logo
- 8CH HD I / O: Various plug-and-play USB connections, 7.1-channel HD ringtones.
This model cannot be shown around the world. Please check with your local dealer for the availability of this sample in your area.
- Specification
- Help
This model is not sold worldwide. Please check with your local dealer for the availability of this model in your area.
- Supports Socket AM2 + /: am2 AMD Phenom ™ FX / Phenom – Athlon 64 FX / Athlon 64 X2 Dual Core / Athlon X2 Dual Core / Athlon 64 / Sempron Processor
- NVIDIA ® GeForce 6100 / nForce 430 or possibly GeForce 6150SE / nForce 430 chipsets
- AMD LIVE! ™ Done
- Supports dual channel DDR2 1066/800/667/533 (4 DIMM slots), non-ECC, unbuffered memory, maximum capacity up to 16GB.
- ASRock AM2 Boost: ASRock To’s patented systems increase storage performance by 12.5%.
- Integrated NVIDIA ® class GeForce6 DX9.0 VGA, Pixel Shader 3.0, general knowledge max. 256 MB
- 1 PCI Express x16 slot
- Unlinked overclocking: when overclocking, the FSB has more leeway thanks to the fixed PCI-PCie / bus
- Hybrid Booster – ASRock Safe Overclocking Technology
- 4 x SATA2 3.0 Gbps, for (RAID raid 0, RAID 1, RAID 0 + 1, RAID 5, JBOD), NCQ, combined with hot swap functionality.
- HDMI_SPDIF header, which provides SPDIF audio output to HDMI VGA memory card, allows the system to connect HDMI digital TVs / projectors / LCD devices.
- 7.1 CH Vista ™ Windows ® High-Level Audio HD (ALC888 Audio Codec), 10/100 Ethernet LAN
- Windows Vista ™ Support ® Premium Logo
- 8CH HD in / out: Three USB plug-and-play, 7.1 HD for popular music.
Main functions:
– Supports Socket AM2 + / AM2 processors: AMD Phenom FX / Phenom / Athlon 64 FX / Athlon 64X2 dual core Athlon X2 dual core / Athlon 64 / Sempron
– NVIDIA GeForce 6100 / nForce 430 or GeForce 6150SE / nForce 430 chipsets
– AMD LIVE! Readiness
– Supports Dual Channel 1066/800/667/533 ddr2 (4 DIMM slots) non ECC, unbuffered memory, max capacity up to 16GB
– ASRock AM2 Boost: ASRock patented technology to expand memory up to 12, 5%
– Integrated NVIDIA GeForce6 DX9.0 VGA, Pixel Shader 3.0, 256MB maximum memory
– 1 PCI Express x16 slot
– Untethered overclocking: FSB has more freedom during overclocking thanks to Fixed PCIE / PCI Busses
– Hybrid Booster – ASRock Safe Overclocking Technology
– 4 x SATA2 3.0 Gbps, Supports RAID (RAID 0, RAID 1, RAID 0 + 1, RAID 5, JBOD), NCQ and hot features
– Connect HDMI_SPDIF header, transfer SPDIF audio output to HDMI VGA card, let the system match digital TV / Projectors / HDMI LCDs.
– Windows Vista Premium Level HD 7.1 CH Audio Codec (ALC888 Audio Codec), 10/100 Ethernet LAN LAN – Ready for Windows Vista Premium Logo
– 8CH-HD-I / O: 4 Ready-to-Use USB Connections, 7.1 CH HD Audio
Changes:
Update agea code (disable TLB for Phenom B2 processor).
– Save to applicationBIOS to a device such as a USB drive (Fat32 hard drive (FAT32 format) and floppy drive.
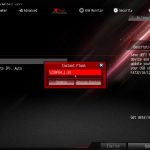
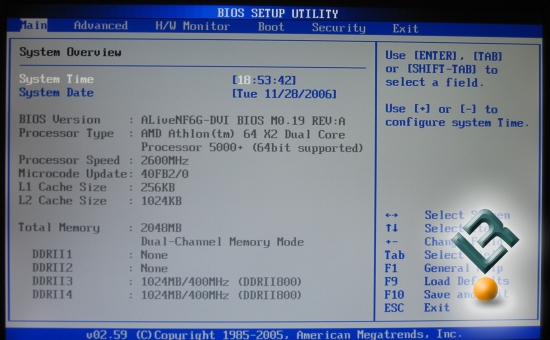
– During POST, press [F2] to access the BIOS setup menu.
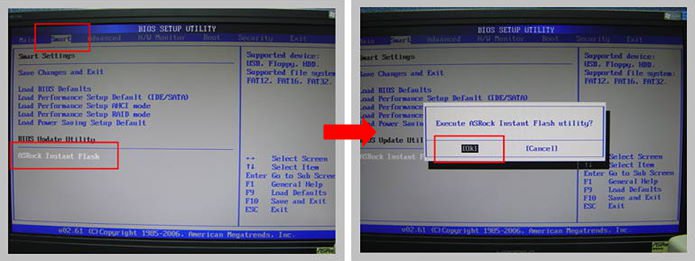
– Select this Instant Flash utility in [Tool] on Run menu.
– ASRock Instant Flash will automatically detect all bundles and list only BIOS versions suitable for all your motherboards.
Select – appropriate BIOS and Flash application .
– Save the BIOS files to a device such as a USB drive (FAT32 format), hard drive (FAT32 format), or a weak drive.
– When you press [f6] this (or perceive).
Select – the appropriate BIOS version with Flash.
– Create a bootable system USB key.
– Download ASRock BIOS updated file for free (WinZip computer hard disk format with .zip file extension) from your website, you will find our disk in the specified location.
– Start the disk created in step 2.
– At the “A:” prompt, type BIOSfile.exe and press [Enter]. For example: A: H87Pro ~ 1.exe [Enter], then you will see that the program recognizes the model name; When finished, you need to press any key to restart.
– After restarting the system, the BIOS of the sedan will be updated. ” Press Enter, then restart.
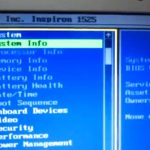
– After restarting the system [F2], press to enter the installer BIOS during boot. Select “Load default settings” from exit and press [Enter] to continue.
– Select “Exit Saving Changes” and highlight the projector with the new BIOS.
– – Download the BIOS package (WinZip format with .zip file extension). And preferably all programs.
– Unzip and prevent all files from ending up on the same mailing list from anywhere available while hosting the system. And you should see the name of the BIOS .EXE file.
– Click the name of the BIOS.exe file
– A warning dialog box appears with the warning “Before updating the BIOS, you must reboot the system, please close.” restart now. ” Click Yes.
– After restarting the system, the BIOS will update automatically. Do not shutdown during UEFI update.
– “Press Enter” is displayed after the It-BIOS update is complete. press Enter, then restart.
– After restarting the software, press [F2] to press the key in the utility No BIOS settings at boot time. From the Exit menu, select Load Defaults and press To [Enter] to continue.
– Select “Exit Saving Changes” and press To [Enter] to enter the corresponding BIOS setup utility. Output.
– The download is now complete with the new BIOS.
While installing a newer BIOS version may add new features, update various components, or improve the usability of a specific device, this process is very dangerous, so it is recommended not to continue. updating only when it is likely to be needed.
In addition, this task should be performed by whoever has the most knowledge to complete this installation; ordinary users can reply to them at their own risk.
When it comes to installing the latest version regardless of the computer operating system, the most common method for flashing BIOS is to create a bootable USB CD or update CD report and run it. back.
Recommended: Fortect
Are you tired of your computer running slowly? Is it riddled with viruses and malware? Fear not, my friend, for Fortect is here to save the day! This powerful tool is designed to diagnose and repair all manner of Windows issues, while also boosting performance, optimizing memory, and keeping your PC running like new. So don't wait any longer - download Fortect today!

However, regardless of the application used and whether or not it is intended toupdate for the general or demanding user, it is recommended to use the latest BIOS in a low power environment such as an inverter environment.
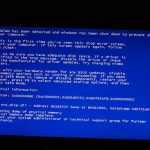
The Basic Input / Output System (BIOS) is very important software for the currently installed operating system, but it also checks all the electronics in the system, so make sure customers install it correctly.
Remember that a successful installation can seriously damage your device, and a faulty BIOS resulting from this process can make it completely unusable.
As soon as this useful version contains changes, click the download button, get suggestions and update the BIOS version. Otherwise, check our site as often as possible so that no one misses the publication someone needs.
Download this software and fix your PC in minutes.
Alivenf6g Vsta Update Bios
Alivenf6g Vsta Aktualizacja Bios
Bios De Atualizacao Alivenf6g Vsta
Lifenf6g Vsta Mise A Jour Du Bios
Livenf6g Vsta Obnovit Bios
Bios De Actualizacion De Alivenf6g Vsta
Alivenf6g Vsta Uppdatera Bios
Alivenf6g Vsta 업데이트 바이오스
Bios Di Aggiornamento Livenf6g Vsta