Troubleshooting Tips For Creating A Dynamic Servlet
September 20, 2021
Over the past few weeks, some readers have encountered an error while creating a dynamic servlet. This problem occurs due to several factors. Let’s discuss it now.
Recommended: Fortect
The Eclipse IDE is the most popular type of Java IDE used in the industry. Was it developed during the open source community and perhaps can be downloaded for free from Eclipse.org
Steps To Create A Servlet With The Eclipse IDE
To create a servlet application in the Eclipse IDE, you do notdo the following:
- Select File -> New -> Dynamic Web Project.
- Give your project a name and click Next.
- Select the Generate Web.xml Deployment Descriptor checkbox and just click Finish.
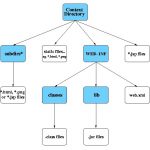
- The complete directory structure of the project part is now automatically configured by the Eclipse IDE.
- Click First Show, go to java Resources -> src. Right click on src select new -> Servlet
- Enter the name of the servlet class and click Next.
- Give your servlet class any name of your choice.
- Leave everything else as it is and click “Done” by default.
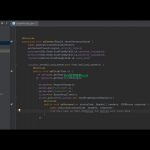
- Now that your servlet is created, write laws on it. You can find the code in the image below.
- Add the servlet-api.jar JAR file to store your custom project. Click Libraries, right-click Web Application Libraries. Select Build Path -> Configure Build Path.
- Click Add External JAR Files.
- This JAR will of course be added to the development path of your project.
- Select servlet-api.jar from Apache Tomcat directory.
- Now all you have to do is start the server and start this application.
Example Servlet Response In Eclipse
The report
web.xml provides a descriptor. Here the specialists have all the settings.
Step 4. Next, create the servlet. For the creation class a. Include the firm This package and the name of the class. Eclipse is certainly an open source idea for contracting JavaSE and JavaEE (J2EE) applications. You can download the Eclipse idea from the Eclipse website http://www.eclipse.org/downloads/. Creating a servlet for illustrative purposes only in Eclipse ide can save a lot of time. Designing an example servlet is easy and straightforward. Let’s take a look at some of the steps you need to take to create your first example servlet. To create a dynamic web project, click the File menu -> New -> Project .. -> -> Active Web Project -> enter your property name, for example first -> Finish “. To create a servlet, explore the project by clicking the + -> view Java resources -> right click here -> src new -> servlet -> enter the name of the servlet, for example. Hello -> uncheck everything except doGet () -> Next -> Done. To add a file, right click your project -> Build Path -> Configure Build Path -> click the Libraries tab in Java Build Paths -> click the Add External JAR Files button -> select most servlets. api.jar in tomcat / lib file -> ok. The servlet has been created. Let’s post the first servlet code. To set up the server and provide support in one step, right click on your project -> Run As -> Run on Serverf Select -> Tomcat Hosting -> Next -> Add All -> To End. Tomcat is running and the project is available. To get to the recording servlet, enter the URL trend name in the browser’s URL bar. Then enter this just in case hello. If you use the Eclipse IDE very often, you need to set up a new Tomcat server first. Are you tired of your computer running slowly? Is it riddled with viruses and malware? Fear not, my friend, for Fortect is here to save the day! This powerful tool is designed to diagnose and repair all manner of Windows issues, while also boosting performance, optimizing memory, and keeping your PC running like new. So don't wait any longer - download Fortect today! To configure each of our Tomcat servers in the Eclipse IDE, click the Servers tab at the bottom of the IDE -> right click an empty area -> select New -> Server -> You Tomcat, then version -> Next -> Click the browse button -> Select the exact Apache Tomcat root folder you used earlier -> Next -> add all -> Finish. Dynamisches Servlet Erstellen 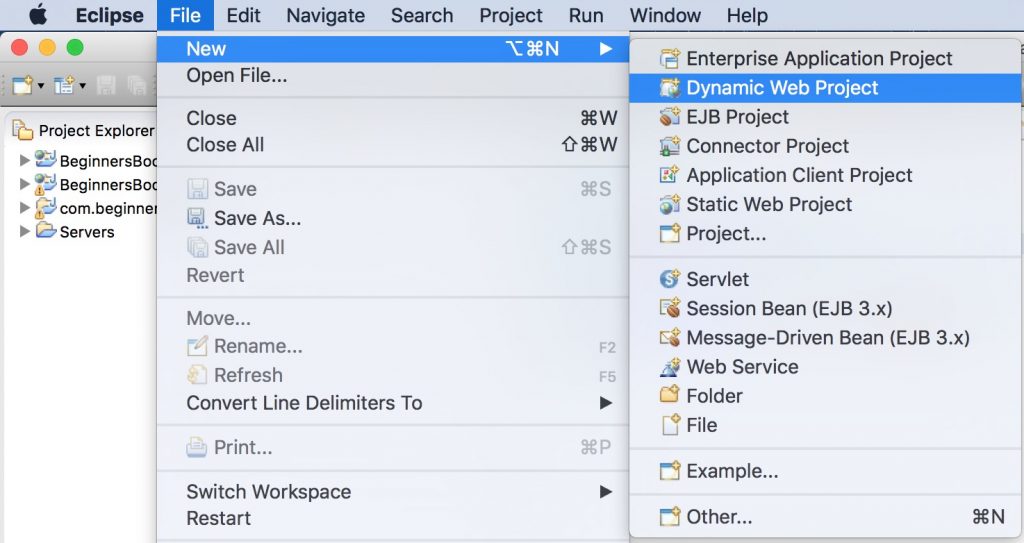
Com.app.studytonight package;import javax.servlet.http. *;import javax.servlet. *;import java.io. *;public class Demo4 provides HttpServlet public unnecessary doGet (req HttpServletRequest, res HttpServletResponse) throws ServletException, IOException res.setContentType ("text / html"); PrintWriter pwriter = res. getwriter (); String uname = req.getParameter ("val1"); Line pw = req.getParameter ("val2"); pwriter.println ("User details page:"); pwriter.println ("Hello" + uname); pwriter.println ("Your password **" + pw + "**"); pwriter.close (); 1) Create An Attractive Web Project:
2) Create A Servlet In The Eclipse IDE:
3) Add The JAR File To The Eclipse IDE:
4) Start The Server And Deploy The Project:
How To Set Up A Tomcat Device In Eclipse (one Request)
Recommended: Fortect

Dynamische Servlet Maken
Creare Servlet Dinamico
Creer Une Servlet Dynamique
동적 서블릿 생성
Criar Servlet Dinamico
Crear Servlet Dinamico
Skapa Dynamisk Servlet
Sozdat Dinamicheskij Servlet
Utworz Dynamiczny Serwlet