Share Files In Windows Vista And Windows 7? Repair Immediately
January 5, 2022
Recommended: Fortect
If you have Windows Vista file sharing and Windows 7 error message on your computer, you need to check out these repair ideas. g.Open File Explorer.Navigate to the folder you really want to share.Right click on the folder you want to talk about and select Properties.Click the Share tab, then click the Share button.Click the arrow in the drop-down list, select All, and then click Add.
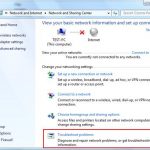
The first category is “Network and Sharing Center”, immediately click on the search box in the “Start” menu and press “Enter”. Now make sure you can turn on network discovery, file sharing, and printer sharing and sharing under advanced sharing settings. Make sure they are activated on both personal and work profiles, and therefore public profiles.
I was wondering how this might cause simple file sharing here on Windows Vista 
Here is a step-by-step guide to show you how. Be aware of..
1) First of all, you need to confirm that you have enabled manual registration and printer sharing on the network card.Go to Start and right-click Network, then click Properties.
2) The Network and Sharing Center window is currently displayed. Then click on “Manage Network Connections” in the left pane.
Click the “Start” button, type “Control Panel” and press “Enter”.Double-click the icon for the specific Network and Sharing Center, then click Change advanced sharing settings.Click the down arrow next to the network for which you want to support file and printer sharing.Select the exact option Turn on file and printer sharing.
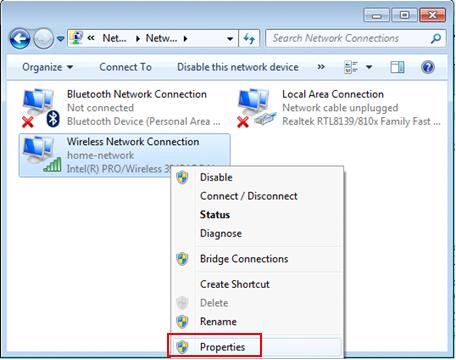
3) The connections in the network window will be displayed. Here, someone can right-click the Socialization card you are currently using and select Properties.
Recommended: Fortect
Are you tired of your computer running slowly? Is it riddled with viruses and malware? Fear not, my friend, for Fortect is here to save the day! This powerful tool is designed to diagnose and repair all manner of Windows issues, while also boosting performance, optimizing memory, and keeping your PC running like new. So don't wait any longer - download Fortect today!

4) Your computer’s network card properties window will open, then click “File and Printer Sharing for Microsoft Networks” and finally click “OK”.
5) Now go back to the Network and Sharing Center window and define the type of networklocation of the corresponding computer. I would advise you to use a private network as your needs will correspond to file sharing in your home circle. If your network location type is Public, learn how to change the network location type here. also
Note. I recommend using the same workgroup name for all computers on the same network. This is a quick guide to setting up computer name and workgroup in Windows Vista.
■ To exchange information files from any folder on the current computer. Right-click the file you want and select Share. 2. In the Select People to Share with My Computer dialog box, select the appropriate user and click Share. Note. Users must provide an account and password for this computer to access files.
6) After this search, until you get to the Sharing and Discovery section, turn on file sharing and also turn off password sharing. Click Apply to make your changes, then click OK when done to close most of the windows.
Click the “Start” button, type “Control Panel” and press “Enter”.Double-click the Network and Sharing Center icon, then click Edit AdvancedGeneric Sharing Options ”.Click the down arrow next to the network for which you want to enable image and printer sharing.
7) Now let’s move on to making it easier to share folders / files. Go to the folder containing the formats you want to share, click on that particular folder and click next to Share …
Note. You can also create a simple file share by right-clicking the folder and choosing Properties. I will tell you in detail aboutb this extended file exchange later. serve
8) The exchange window will open. Since you have a password-protected share, you can select Guest, Everyone (everyone in this list), or sometimes other user accounts and click Add. In this case, add i worker Guest and then set individual permission. Finally, on the road to sharing, tap Share.
Right click the merged folder with property selection. Select Sharing calculation and click Advanced Sharing. Check the box next to Share this file. A folder name can be automatically entered as a name in a shared folder.
Note. To set write permissions you may have many other options, choose the one you want:
9) The next window decides that your file is mutual. Click Finish to close the truck window.
10) If you do this after checking the shared folder, you will definitely see that there is People 2 Well Known at the bottom of the folder. Finally, you can access this added folder from Vista, XP or many Windows operating systems without user authentication. This is a simple file that starts the discussion process.
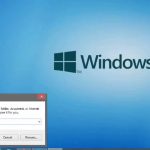
Note. In some cases, you may be asked for a username and password, even if it’s just file sharing. Introduce the name of the guest who does not have password access to the shared folder.
Note. Remember to turn off this username / password-free file sharing feature if customers no longer need it.
However, the dirty little secret of both operating systems is that Windows 7 is actually an optimized version of Vista that, according to experts, improves on the shortcomings of the previous operating system. Either way, there’s no denying that Windows 7 is going to be awesome. Here are some reasons why it beats Vista.
Note. You must have permission to click on that shared folder and select Properties, then go to the Security tab. Check the groups or media names that are allowed to enter this folder and make sure our own users / groups that were assigned to you during the sharing process are also listed (usually set automatically when you share files) in case it not this way. Click Change to include missing users / groups. Please everyone knows that anyone can access the folder type. v
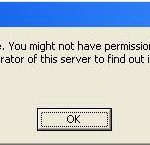
If a specific user / group that you authorized during the sharing process does not match the user / group listed here, the missing primary user may not be able to save that shared folder, especially the imagepay attention! Or, the user is looking for a hint that says they may not have permission to use this “network” resource if they are now trying to access this shared folder from another computer.
Try it, but experiment with a few different settings to see which one might work. Simple file sharing is fun and easy!

Back to top “Turn on file sharing on Windows Vista” !!
Player – can only view or play files in the shared folder.
Contributor – Allows a group of people to potentially view all the content and files they’ve added, and edit or delete any added files.
Co-owner is a person or group who has permission to view, edit, add, and delete files only in the shared folder.
Note. Allow file sharing only with read, modify, and write permissions if you really want to. Otherwise, read-only mode is sufficient.
Download this software and fix your PC in minutes.However, a dirty little classification of the two operating systems is that Windows 7 is a completely optimized version of Vista that eliminates the shortcomings of the previous system of use. In any case, the fact that Windows 7 turned upside down cannot be refuted. Without a doubt, here are five advantagesVista creatures.
Make sure network discovery is enabled on your Windows 7/8/10 PC. You can do this simply by going to Control Panel, then to Network and Sharing Center and clicking Change advanced sharing settings in the appropriate left pane. Make sure the Enable Network Discovery radio button is currently selected.