What Are The Reasons, How To Enable Audio Services In Windows XP And How To Fix It
February 25, 2022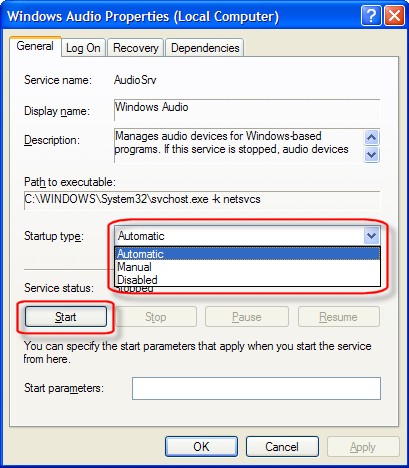
We hope that if you know how to enable sound services in Windows XP on your PC, this user guide will help you more.
Recommended: Fortect
First, start a new kernel.List most other older kernels with the basic dpkg command.Notice the system space implementation by running the df -H command.Purge old unused kernels, run: sudo, probably –purge autoremove.
In Linux, each of our kernels plays a central role in the actual operation of the system. As new versions created by Linux are released, the system can be upgraded to a newer kernel.
By default, modern versions of Linux keep the latest kernel plus the older version. However, in some cases, Linux does not support older kernel versions. A common problem with older kernels is the long list of bootable kernels in the GRUB (Boot) menu.
This guide will help you remove old and unused Linux kernels from your Ubuntu system.
- Ubuntu 19.04, 18.04, 16.04 system
- Terminal window and command line (Ctrl+Alt+T, Search > Terminal)
- On a player account with sudo rights
Remove The Old Ubuntu 18.04 And 19.04 Kernel
Show List Of Kernel Versions

To view a list of all installed versionsth kernel, type:
sudo dpkg - - list | egrep -i - -color "Linux-Image|Linux-Header"The output shows a database of all files named linux-image or possibly linux-header. Use it to get an estimate of the number of old cores connected to your system.
You can also count this number of cores with the generic command:
sudo dpkg - - list | -i egrep - -color "linux-image|linux-headers" | toilet - lThis command viewer displays the total number of Linux images and Linux headers.
Remove All Old Kernels From The Command Line
Apt package managers can automatically remove all old kernels. To do this, run a few commands:
sudo apt-get - remove auto-deleteThe system looks for unused kernels and displays a preview of the files it wants to remove. You will be prompted to test your choice of deleting old popcorn kernels by pressing y and Enter during deletion.
Manually Remove Individual Kernels From The Command Line
You can manually remove the client core by naming it with a special name em.
dpkg -l | output -n +6 | grep -E 'linux-image-[0-9]+' | grep -Fv $(uname -r)- rc – currently removed
- ii – installed, to be removed
- iU – downloaded and queued for dpkg installation
sudo --purge [kernel_version]Be sure to enter the exact name and number of the kernel you want to remove. For example:
sudo --purge dpkg linux-image-5.3.Graphical 0-28-genericUse Tools To Remove Old Kernels In Ubuntu 18.04.
Sometimes, when working with large datasets, it can be difficult to navigate the command line interface. Using additional graphical tools can give owners a clearer view and avoid costly mistakes.
Select “Package Cleaner” in the corner and “Clean Core” in the panel.Click the “Unlock” button, when you see at the bottom right, enter your password.In the list that appears, select the main characters and headings that you want to unambiguously remove.
This section explains how to remove old corn kernels in Ubuntu 18.04 using And synaptic Ubuntu Cleaner. These tools can leak various unnecessary information such as cached web browser genealogies, old kernels, and other malware.
How to completely remove the old kernel using Synaptic
Synaptic is a graphical interface similar toapt package manager, which allows you to install, remove, and update software packages.
Like many other tools most often associated with type, this involves finding the software packages you want to remove, marking them for removal, and then confirming your selection to select a specific removal process.
>
Recommended: Fortect
Are you tired of your computer running slowly? Is it riddled with viruses and malware? Fear not, my friend, for Fortect is here to save the day! This powerful tool is designed to diagnose and repair all manner of Windows issues, while also boosting performance, optimizing memory, and keeping your PC running like new. So don't wait any longer - download Fortect today!

Install Synaptic by entering the following command at the prompt:

sudo apt synaptic install -yInstallation usually takes a few minutes. Launch the Synaptic interface from Fatal by typing:
sudo synapticYou now have access to the artistic interface of the Synaptic Package Manager.
- Find the kernel and programs option in the list.
- Click on the kernel you want to remove and purchase the “Mark for Complete Removal” option.
- Synaptic notifies you that dependent clauses should be sufficiently removed. Luckily, Synaptic automatically identifies you as an individual as soon as you hit the identify button.
- Check from Checked packages or click “Apply” if you are satisfied.
- To complete the uninstall process, cancel “Apply” in the summary popup.
- The panel allows you to control and view deletion operations. Close the window manually as soon as the system informs you that the removal of the old kernels was successful. In addition, you can check the box for the person so that it will automatically close after the process is completed. For
- Check the Old kernel box.
- Select the kernels you want to completely remove.
- Click the Purge button.
- The Ubuntu cleanup tool may notify you that more changes are needed to complete the process. Keep clicking if people agree.
- The old kernel is being removed.
- Once the process is complete, you will get Cool! your system is clean! Frequency as confirmation.
>< /ol>
How to remove any good old kernel with Ubuntu Cleaner
With Ubuntu Cleaner, you can keep your layered interface at its best by removing unnecessary browser caches, packages, and software package installers.
This open source software is not available in the official repositories and must be obtained as a PPA and then configured by you.
Type the following command in a terminal to add the Ubuntu Cleaner PPA:
sudo add-apt-repository apt ppa:gerardpuig/ppasudo organize ubuntu-cleaner -yAfter the installation process is complete,enter the following command to access Ubuntu Cleaner:
sudo ubuntu-cleanerOpen a terminal ( Ctrl + Alt + T ).Type uname -b.Run the following command: dpkg –list | grep Linux image **cr** **cr**Write down the names of all the shared kernels you want them to be removed.To remove kernels, run: sudo apt-get remove linux-image-x.x.x.x-xyz (replace the kernel ID with the appropriate one).
Use the Ubuntu Cleaner GUI to remove my old kernels:
How To Remove Old Unused Kernels In Ubuntu 16.04 And Earlier
Earlier versions of Linux did not come with tools to work with older kernels by default.
1. To remove old Linux kernels, you must first install the Byobu tool:
sudo apt-get install byobusudo purge-old-kernelsDownload this software and fix your PC in minutes.Click the menu selector on the panel to open the full application menu.Go to System > Update Manager.In Update Manager, click Main Menu > Edit > Settings.Go to the Automation tab.Turn on our "Remove obsolete kernels and dependencies" toggle.
Step 1: First check if you have legacy kernel images on your RedHat/CentOS system.Step 2: Install the yum-utils package.Step three or more: Remove old kernels.Step 4: Remove unexpected dependencies that are no longer needed when the system.
Comment Activer Les Services Audio Dans Windows Xp
Windows Xp에서 오디오 서비스를 활성화하는 방법
Kak Vklyuchit Zvukovye Sluzhby V Windows Xp
Come Abilitare I Servizi Audio In Windows Xp
So Aktivieren Sie Audiodienste In Windows Xp
Como Habilitar Los Servicios De Audio En Windows Xp
Hur Man Aktiverar Ljudtjanster I Windows Xp
Como Habilitar Servicos De Audio No Windows Xp
Jak Wlaczyc Uslugi Audio W Systemie Windows Xp
Hoe Audioservices In Windows Xp In Te Schakelen