What Causes Perc 2 Raid Bios And How To Fix It
September 1, 2021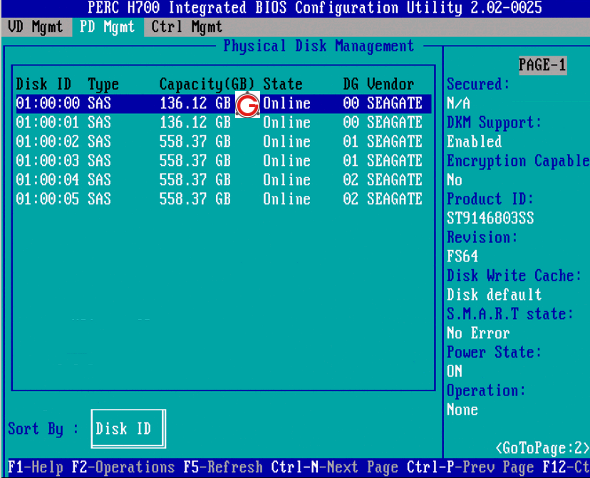
In this article, we are going to describe some of the possible causes that can cause the Perc 2 Raid BIOS to start up, and then I will show you the different ways you can try to fix this problem.
Recommended: Fortect
ç ¾è ± ¡
åŽŸå ›
è§ £ æ ± ºæ – ¹æ³ •
- BIOSム¢ ーム‰ 㠧㠯㠀 èµ · å ‹• ä¸ã“ Ctrl + Rã’ーã”押㠖 ã ã ™ ã € ‚
- UEFIム¢ ーム‰ 㠧㠯㠀 F2ãーを押㠖 ã ã € System Configuration(㠂ã¹ãƒ † ã ã‚ ”ッãトã ã ããããããããão ã¹ããão ããã † ムム”ã‚ ”ットã ッム– 㠡ヂ¤ãƒ³ã ッƒãã‚ããã³ã ãã ãããšãã³ã ãƒã ッ³ Settings ムãã¤ããã € ãà † クãック㠗㠾㠙 ã € ‚
- UEFIム¢ ーム‰ 㠧㠯㠀 F2ã‚ーを押 – ã ã € System Configuration(㠂· ã¹ãƒ † ã ã‚ ”ッããƒãã ãããããƒããão ããƒãƒãƒ‚ ã € Œ Main Menu System Settings(㠂ã¹ãƒ † ã ã” ”ãããã ã ‚‚ çˆã? ムã‚ã‚è¨å®šï¼ ã ã € ã ®é † ã クãック㠗㠾㠙 ã € ‚
ã “ã ®æ– ‡› ã’è © • 価
If necessary, I have photos that I can send you along with the Service Tag, but I cannot choose how.
VD Mgmt states that the two 893GB hard drives are usually unconfigured physical hard drives.
If I press F2 on one of the two, I will open the operations page
Rebuild, Member Replace, Force On / Off, Hot Spare Removal, and Conversion to Compatible RAID
So based on my interpretation that “route conversion to RAID capacity” is not selectable, I had to switch to SATA BIOS settings as I said
In System BIOS Settings> Settings and SATA ”>“ Onboard SATA ”there are three options:

When I select RAID, this mode displays a warning that personal data will be lost.
If I now lose the OS on two hard drives that are already in raid 1, this will sort of bring me back to reboot. If only two unconfigured hard drives are not a problem in themselves.
The PlateSpin Forge must have a RAID storage array to provide disk space for fault tolerance. When starting the PlateSpin Forge Appliance for the first time, use the Dell PowerEdge Scalable RAID Controller (PERC) BIOS setup utility to fine-tune the correct RAID type for your system. See Table 2-1, RAID Device Configuration Forge.
NOTE. To complete this task, you will need to connect this keyboard and a monitor that will use the server hardware for your device.
Do not use Dell USB Enhanced Multimedia Keyboard – Model: SK-8135. USB is known to contribute to conflict.
Start the server hardware.
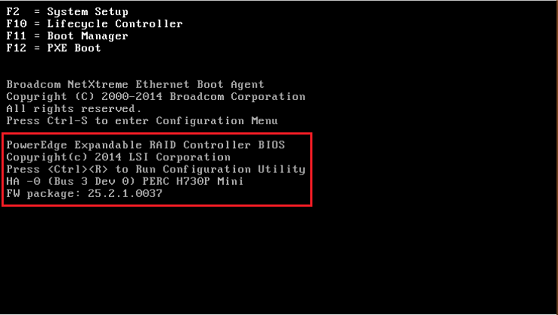
During the transition to In Trainer Standby Mode, approximately 24 seconds after the BIOS screen of the PowerEdge Expandable RAID Controller appears, press Ctrl + R to add the PERC Configuration Utility as a new item.

Configure the PERC RAID controller across multiple logical drives, much more than one RAID array (this counts as RAID 6, RAID Ideas, or RAID 1 depending on the appropriate RAID type for your new hardware):
Remove all existing Disk Groups:
ATTENTION! Deleting a Disk Group will delete the recording data in that Disk Group.
On the Virtual Some Disk Management page, select the most recent Disk Group, then press F2.
In some dialog boxes for selecting an operation.

Repeat steps 3.a.a and 3.a.b for most existing Disk Groups.
Create a new disk user for the Forge system:
On the Virtual Disk Management page, select the RAID controller whose root is displayedThere is a tree, then press F2.
Usually in the operation selection menu.
On the Create New Virtual Disk page, configure the extended virtual hard disk with parameter values:
Select the RAID configuration you need for your array storage.
Select RAID-6, RAID-5, or RAID-1 based depending on the Forge model. See Table 2-1, Device RAID Configuration Forum.
Select all physically accessible hard drives that are clearly members of the RAID array. To select a drive, highlight the drive and the media space.
Hard drive sizes may vary depending on the Forge model.
Specify the size of the Forge system drive. The recommended specification is 300 GB.
Recommended: Fortect
Are you tired of your computer running slowly? Is it riddled with viruses and malware? Fear not, my friend, for Fortect is here to save the day! This powerful tool is designed to diagnose and repair all manner of Windows issues, while also boosting performance, optimizing memory, and keeping your PC running like new. So don't wait any longer - download Fortect today!
- 1. Download and install Fortect
- 2. Open the program and click "Scan"
- 3. Click "Repair" to start the repair process

Enter 300 if the PERC controller displays the hard disk size in GB. Enter 307200 if the disk size is displayed.It is compressed in MB.
Enter colspan = “1” ForgeSystem. The electronic data carrier is case sensitive.

Select and enter “Marketing”.
Create a new CD / DVD group for Forge Failover VMs:
In the virtual Internet tree in Disk Management, select _ (see step 3.b.c) and press F2.
In the operation selection menu.
On the add a virtual disk in Disk Group 0 page, organize a new virtual disk for which the options for failover are set to the following parameters:
Depending on your data plan, use the remaining computer storage as your default backup storage, for example 22050 GB.Colspan = “1”
Enter fault tolerant virtual machines. The name of the confidential volume sensesRegarding the register.

Choose journalists and get involved.
Configure fast hard disk initialization for each virtual hard disk:
On the Virtual Disk Management page for
Download this software and fix your PC in minutes.In BIOS mode: Press Ctrl + R during boot.In UEFI mode, press F2 to enter the program The system settings diagram. Click the System Setup main menu screen, then click Device Settings.
When the BIOS prompts you, press Ctrl-R to access the RAID setup utilities.Select the root part of the tree that appears on the screen and press F2.In the Create New VD option, press the Enter key all the way down to go to the new virtual disk layout screen.
Press F2 during boot to enter BIOS setup.To enable RAID, use one of the following methods depending on your card model. Go to Configuration> SATA Drives and set SATA Chipset Mode to RAID.Press F10 to collapse and exit.
Perc 2 Raid Bios
Perc 2 Raid Bios
Perc 2 Raid Bios
Perc 2 Raid Bios
퍼크 2 레이드 바이오스
Perc 2 Raid Bios
Perc 2 Raid Bios
Perc 2 Rejd Bios
Perc 2 Raid Bios
Bios De Incursion De Perc 2