Troubleshoot Windows XP CD Boot Sector Download The Easy Way
January 22, 2022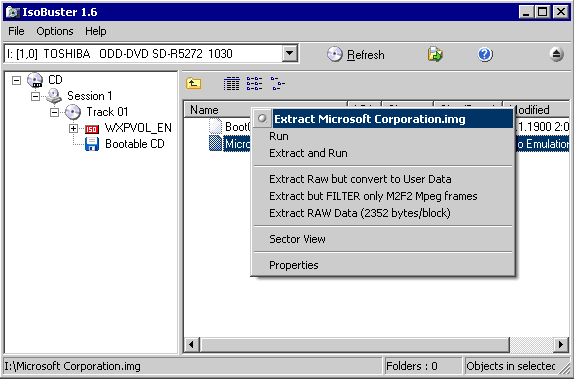
Recommended: Fortect
This user manual was created to help you retrieve the error code boot sector from the Windows XP CD.
Many desktop and laptop vendors that ship Windows XP with your primary computer preinstall it instead of providing you with a Windows XP installation disc. If your computer crashes or you are just waiting for a clean reinstall, you will need to purchase another Windows XP license. Creating your own recovery hard drive avoids this problem.
Preparation
Step 1
Reverse acceleration for the entire hard drive. For a list of free disk duplication software, visit thefreecountry.com (see Resources).
Step 2
Find your Windows XP Essential license number (or product key). Often times, all the numbers will be glued to the side of your computer case, possibly the bottom of your laptop. If you can’t find it, see Resources for a list of free key finders.
Step 3
Download “wxp10, ” veryThe zilch-like Windows XP boot sector folder that is included in the Windows XP installation discs from one of these mirrored downloads on Nu2.nu (see Resources).
Step 4
Create A Reinstall Disk
Step 1
Browse to the C drive on your PC (which appears in the My Computer folder). Right-click any space inside, click New at the top, and then click New Folder. Rename it as “reinstall ”
Step 2
Find the “i386 ” file in C, on your primary drive. Right-click it and select Copy.
Step 3
Open “reinstall ” file. Right click anywhere and find insert. After the download time has elapsed (which can be long because a particular i386 folder is about half a gigabyte in size) replicas will necessarily appear for each i386 folder.
Step 4

Open Notepad (found in Start> Programs> Accessories). Type “Windows ” (without quotes), then press the spacebar once, in this case press Enter once. Then go to File> Save and save the file as “WIN51 “(put quotes this time) to reinstall the file. If your computer came with XP Home Edition, copy the WIN51 statement and copy it to your reinstall folder as WIN51IC. If your computer came with XP Professional, do the same , it should copy the name WIN51IP.
Step 5
Recommended: Fortect
Are you tired of your computer running slowly? Is it riddled with viruses and malware? Fear not, my friend, for Fortect is here to save the day! This powerful tool is designed to diagnose and repair all manner of Windows issues, while also boosting performance, optimizing memory, and keeping your PC running like new. So don't wait any longer - download Fortect today!

Open the wxp10.zip folder. Navigate to Albums >> wxphome files> w2ksect.bin. Drag the w2ksect.bin file to the current root folder of drive c (not the recovery folder).
Step 6
Step 7
Open ImgBurn and choose> Build Mode from the menu, then File> Load Project. In the field that opens, navigate to the current XPSETUP.ibb file and click “Open ”
Step 8
Place a white CD or DVD around the CD or DVD burner. Wait a moment, then make sure that an empty hard drive appears in the target area of ImgBurn (which, depending on the version, may be in the lower left corner of the window).
Step 9
You can click any label option or icon at the bottom of the ImgBurn screen. If you get the warning “You have mostly selected a folder, this is the root folder.Is it a log? ” Click Yes. After that, it might well be possible to create a Windows XP recovery disc.
In plain text, copy the text below and paste this method into Notepad. Save the information (wherever you want) with all the “XPSETUP -names.ibb ” (quotes INCLUDED).
IBB
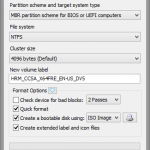
[START_BACKUP_OPTIONS] BuildMode = 1 Destination = 0 TestMode = 0 Verify = 1 WriteSpeed = 0 Copies = 0 PreserveFullPathnames = 0 filesystem = 0 RecurseSubdirectories = 1 IncludeHiddenFiles = 0 IncludeSystemFiles = 0 IncludeArchiveFiles = 0 IncludeArchiveFiles = 0 0 AddArchiveFilesOnly = 0 AddArchiveFilesOnly = 0 Add_WhenOnly = 0 Add_WhenOnlyue = 0 IncludeArchiveFilesOnlyue = 0 Add_WhenOnlyue96 = VRMHOEM_EN VolumeLabel_Joliet = VolumeLabel_UDF = Identifier_System = Identifier_VolumeSet = Identifier_Publisher = Identifier_Preparer = Identifier_Application = Dates_FolderFileType = 0 Restrictions_ISO9660_InterchangeLevel = 0 Restrictions_ISO9660_AllowMoreThan8DirectoryLevels = 1 Restrictions_ISO9660_AllowMoreThan255CharactersInP ATN = 1 Restrictions_ISO9660_AllowFullASCIICharacterSet = 1 Restrictions_ISO9660_DontAddVersionNumberToFiles = 1 Restrictions_Joliet_InterchangeLevel = 1 Restrictions_Joliet_AddVersionNumberToFiles = 0 BootableDisc_MakeImageBootable = 1 Bootabl e Disc_MediaEmulationType = 0 BootableDisc_BootImageFile = C: w2ksect.bin BootableDisc_DeveloperIdentifier = 0 BootableDisc_Load = 0 is c_LoadSectorCount = 4 [END_BACKUP_OPTIONS]
[START_BACKUP_LIST] C: EN XPSIST [END_BACKUP_LIST] [END_BACKUP_LIST] [_BACKUP_LIST] [_BACKUP_LIST ]
Michael Dance is a successful freelance writer who owns MovieCultists.com. He has been cited as a film critic by TheCinemaSource for.com for RottenTomatoes.com and national advertising activities. He graduated from New York University’s Tisch School of the Arts in 2007 and currently resides in Washington, DC.
Windows XP
Create this bootable Windows XP SP2 / CD
Requirements:
Step by step:
Go to the Copy Windows XP SP3 ISO Image page.Select your language from the dropdown menu and click the big red download button…Download a free program like ISOtoUSB to write the symbolic representation to a USB stick.Install ISOtoUSB on your computer and read.
You will need to use a bootable CD to start your computer and run diagnostics if you are having trouble starting an installed feature of your Windows XP operating system – for example, if your product files have been corrupted after every software attack. You can create an MS-DOS bootable floppy disk, usually using the utilities built into Windows XP.
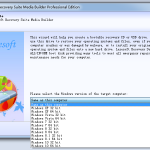
Step 1: Go to the home page of the app.Step 2: Choose disaster recovery.Step 3: Select the “Bootable CD” option.Step 4: Select your boot disk.Step 5: Select the type of bootable media.Step 6: Create a bootable image.Fifth step: write the boot image.
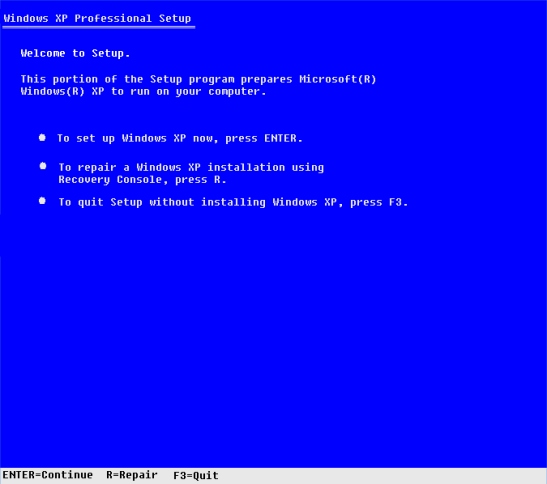
The Windows XP CD is bootable and gives you access to a tool called the Recovery Console. To boot from the Windows XP CD, insert it into the affected system’s CD-ROM drive and press [Ctrl] [Alt] [Del] to restart the software.
Windows Xp Cd의 부트 섹터 다운로드
Download Opstartsector Van De Windows Xp Cd
Descargar Sector De Arranque Del Cd De Windows Xp
Baixar Setor De Boot Do Cd Do Windows Xp
Pobierz Sektor Rozruchowy Systemu Windows Xp Cd
Ladda Ner Startsektorn For Windows Xp Cd
Bootsektor Der Windows Xp Cd Herunterladen
Telecharger Le Secteur De Demarrage Du Cd Windows Xp
Scarica Il Settore Di Avvio Del Cd Di Windows Xp
Skachat Zagruzochnyj Sektor Windows Xp Cd