Best Way To Fix SIP Servlet Eclipse Tutorial
January 11, 2022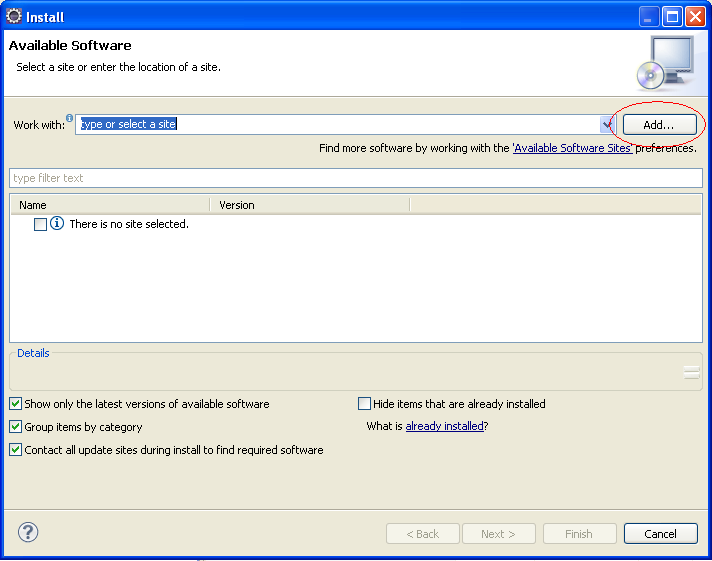
Over the past few days, some of our users have encountered an error in the SIP Servlet Eclipse manual. Several factors can cause this problem. Let’s discuss this below.
Recommended: Fortect
The following sections describe how to use Eclipse to develop SIP servlets for use with Oracle Communications Converged Application Server:
Overview
Recommended: Fortect
Are you tired of your computer running slowly? Is it riddled with viruses and malware? Fear not, my friend, for Fortect is here to save the day! This powerful tool is designed to diagnose and repair all manner of Windows issues, while also boosting performance, optimizing memory, and keeping your PC running like new. So don't wait any longer - download Fortect today!

This document provides step-by-step instructions for using the Eclipse IDE as a tool for developing and deploying SIP servlets with Oracle Communications Converged Application Server. A complete development environment should contain the following components that must be obtained and installed before proceeding:
SIP Servlet Name = “wp1077146″> Organization

Setting Up The Development Environment
Follow these steps to set up the required development environment for your new SIP servlet project:
Create An Oracle Converged Communications Application Server Domain
To deploy and test the SIP servlet, you must access the Oracle Converged Communications Application Server domain, which can usually be reconfigured and restarted as needed. Follow the instructions here atIn the installation guide, create an administrative domain so you can use the installation wizard to create a new web address. When buying a new domain:
Configure The Default Eclipse JVM
Trendy versions of Eclipse use version 1.5 of the JRE by default. Follow these people’s directions to configure Eclipse to use JRE version 1.4.2 installed on Oracle Communications Converged Application Server:
Create A New Eclipse Project.
Create Ant Build File
Follow these steps to create another Ant build file, Which you will use to build and deploy the project:
Building And Deploying The Project
The build.xml data you create compiles your ad code, the WAR file, and copies the specific WAR file into the / applications subdirectory of your development domain. Oracle Communications Converged Application Server automatically provides legal applications located in the / applications subdirectory.
Debugging SIP Servlets
To debug SIP servlets, certain debug policies must be enabled when Oracle Communications Application Converged Server starts. Follow these steps to add the required debugging options to the script used to start Oracle Communications Converged Application Server:
- type = “1”>
- Create an interesting Oracle Communications Converged Application Server domain.
- Create a new Eclipse project.
- Generate Ant lets you create a file.
- Start Eclipse.
- Select Name = “wp1077645″> Window-> Preferences
- Expand the Java section in the left pane and list the installed JREs.
- Click Add … to add a new JRE.
- Enter the base name to be used for the JRE innovation in the JRE trademark field.
- Briefly click the Browse … button to go to the JRE Home Directory website window. Then go to the directory with
BEA_HOME/ jdk160_05and click OK. - Click OK to add the new JRE.
- Check the box, then install the new default JRE.
- ClickType name = “wp1077664″> OK to close the preferences dialog.
- Start Eclipse.
- Select file-> New-> Project …
- Java Select Project and return.
- Enter a name for your project in the Project name field.
- In the Location box, select the Create Project in Workspace option if you haven’t started building SIP servlet code yet. If you already have the source code available elsewhere, select New Project Near External Location and select an important directory. Click Next.
- Click the Libraries tab and follow these steps to add the required JAR files to the project:
- Click Add External JAR Files …
- Use the JAR dialog to add the
WL_HOME/server/lib/weblogic.jarfile which is your project .Name = “wp1077258″> - Click Add External JAR Files …. again
- Use our custom JAR selection dialog to open
WLSS_HOME/server/lib/wlss/sipservlet.jarwhich can be obtained for your project. - Add any additional JAR files required for your large project.
- Click name = "wp1077249"> Done to create a new shared project. Eclipse now displays the project name in the package explorer.
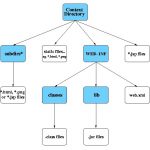
- Right-click the name most associated with your project and use the New-> Folder command to edit the folder in Figure 10-1, Content of the SIP Servlet, was on page 10-2 .
- Click Add External JAR Files ...
- Typically use the JAR selection dialog to save the
WL_HOMEfile/server/lib/weblogic.jarInclude this project.

Handledning For Sip Servlet Eclipse
Uchebnik Po Servletu Sip Eclipse
Sip Servlet Eclipse Tutorial
Sip Servlet Eclipse Tutorial
Sip 서블릿 이클립스 튜토리얼
Didacticiel D Eclipse De Servlet Sip
Popij Samouczek Dotyczacy Zacmienia Serwletow
Sip Servlet Eclipse Tutorial
Tutorial Do Eclipse Do Servlet Sip
Sip Servlet Eclipse Tutorial