Corrective Actions For Canon Print Head Error Problem
November 26, 2021
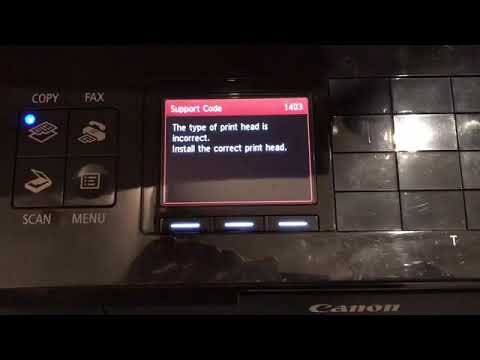
This manual is designed to help you when you receive a Canon printhead error message.
Recommended: Fortect
Canon inkjet printers use printhead notification technology. If there is a printhead problem that requires your attention, the light will blink. If it blinks five times quickly, it is still a printhead error.
Try the following to see if we can solve your problem:
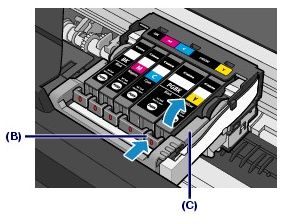
3. Lift up the gray tab on the side of the ink tank holder.
5. Replace the printhead and lock the handle.
6. Return all aquarium ink to the printer.
8. Disconnect it from the printer. Leave it unplugged for about 5-10 minutes.
Printhead abrasion is caused by friction, regardless of materials used or maintenance performed, resulting in printhead failure.
Reconnect the power and turn on the printer. If the error persists, please contact our support team using the link below for more information on this issue.
Is this the answer to your dear question? Click the Accept as Solution button so others can find an answer as well. t.
Step 1
Check the main alarm / power indicator and count the number of blinks to see if there is a problem with the printhead.
2nd Step
Open the printer cover and release the printer cartridges and center. Remove all ink from pistols. Usually use the blue lever to loosen the notch on the head and then reinsert it. Just push in place, reinsert the tanks and close the lid. Turn off the printer, then return to.
Step 3
Perform a test print whenever you need to check the desired print quality and correct watermark output from the nozzles. Hold the button down and press Resume / Cancel. The operation indicator will blink twice. Release the specific key and the test page may well print. Check it out by going to the exit.
Step 4
Perform deep cleaning if this particular test result is incorrect. On the host computer, go to the “Printer Properties” chat window in the “Printers” folder and check the “Maintenance” checkbox on the registration form toand the printer properties dialog box. Select “Deep Cleaning” and, if yes, “Run”. Do a deep cleaning for several days if necessary.
Step 5
Replace the printer ink cartridge if you continue to ask for unsatisfactory results for a specific ink color. The open cover allows the printhead to be centered. Remove the main ink cartridge. Insert a new one into the printer. Close the special cover and allow the printer to reboot completely.
Many Canon printer buyers are confronted with the error message “U052 Incorrect printer chair type.” Repair.
There are two different scenarios associated with the U052 error message. The first is exactly where the printhead is not attached at all, and then a lot of messages “U052 This guy is wrong about the printhead” is an error message.
In the second scenario, the main printhead is installed, but something is probably not working correctly or not working at all. The section in this article provides step-by-step instructions for troubleshooting the problem.Addon for both scenarios.
Recommended: Fortect
Are you tired of your computer running slowly? Is it riddled with viruses and malware? Fear not, my friend, for Fortect is here to save the day! This powerful tool is designed to diagnose and repair all manner of Windows issues, while also boosting performance, optimizing memory, and keeping your PC running like new. So don't wait any longer - download Fortect today!

1. Open the product cover to start using the ink cartridges and printhead. When you open the top cover, the cartridge slot rises automatically at the center of the front of the printer.
2. Remove the printer from the electrical panel assembly. Make sure someone directly on your side of the cartridge has lifted the cartridge lever. From this point of view, the cassette slot probably won’t move automatically.
4. Removing the printer cartridges shows the details of the black head. Now carefully remove the production head from the printer. The new printhead removal technique can be described as grabbing exactly where you want to insert a particular cartridge, gently pulling it inward, and exiting the squeezing motion.
5. Next, do some basic cleanup of the publication header.
6. Insert the printhead and cartridges back into the photo printer and make sure all doors are not open and the back of the handle is securely fastened.
9. Add a test print to see if the bug has just been fixedka U052.
2. Open the printer cover. Typically, when the printer has small cartridges or printheads, the location of the cartridge holes is in the center of the front of the printer with the lever up.
3. Typically, the printhead is installed in the guide next to the capsule slot.
4. Insert the cartridges into the correct slots. Close the lever and make sure the door never opens and the cartridges and printheads are installed correctly.
7. Check the command to see if the U052 error has been cleared.
8. To have time to fix Canon’s printer error in evaluating “U052 This type of head print is considered incorrect”, the approach described earlier in the scenario selection will work. If the danger persists, contact Canon support or a printing specialist.
Kevin is a dynamic and ambitious IT professional who applies a deep knowledge of all the elements involved in the design, implementation and management of a network infrastructure. Excellent track record of completing major missions both on time and on time jet.
Download this software and fix your PC in minutes.캐논 프린트 헤드 오류
Fel I Canon Skrivhuvud
Errore Della Testina Di Stampa Canon
Canon Druckkopffehler
Canon Printkop Fout
Erreur De Tete D Impression Canon
Oshibka Pechatayushej Golovki Canon
Erro De Cabecote De Impressao Canon
Blad Glowicy Drukujacej Canon
Error Del Cabezal De Impresion Canon