Tips For Changing Webcam Settings In Windows 7
December 10, 2021
If you have webcam settings on your Windows 7 PC, this blog post might help you fix the problem.
Recommended: Fortect
Press Windows + I to open Settings.Click on “Privacy,” then select “Camera” in the larger part of the left pane.Click the Change button under the Change Access for These Devices heading.Set the switch to ON in the direction of access authorization.Also turn on the “Allow apps to access camera” switch and scroll down.
You can move your mouse pointer to the All Users Startup folder by always choosing Start> All Programs. If so, right-click Startup and select Open.
Chamele0nLangley, WA27 days in ITA +, CCNA, MCITP, Network +, Security +
Matt Bergeron
In Windows, search for and open Device Manager in Google. In Device Manager, double-click Imaging Devices. Make sure your webcam or video device is listed under Imaging Devices.
The Install folder is a convenient way to open programs or scripts when a user logs on.
- for each man or woman or
- all users
Below is usually the location of the default startup directory for Windows 7, Windows 8, let alone Windows 10.
Windows 7, 8, 10 New Venture Folder Locations
Startup Folder For Current Record In User
In the Control Panel windowI see System and Security. In the System and Security window, under System, click Device Manager. In the Device Manager window, if you need to map devices, click the arrow next to it to expand the option. Under Imaging Devices, click to select a Sony Visual Communications Camera.
% AppData% Microsoft Windows Start Menu Programs Start
Startup Folder For Additional Users
C: Users % UserName% AppData Roaming Microsoft Windows Start Menu Programs Startup
Home Folder For Most Users
% ProgramData% Microsoft Windows Start Menu Programs Pusc
Win + R.Enter shell: normal boot. and press Enter:Copy the file or executive document frequently. Use the “Paste” or “Paste” shortcut to place only a specific Startup folder in “General”:
C: ProgramData Microsoft Windows Start Menu Programs Start
Do you like a clear start, a neat and organized menu? All you have to do is even open a dedicated folder in the Start menu so you can organize it however you like. Here’s how to do it.
Windows 10 offers many options for customizing the Start menu, but you can no doubt organize your apps the same way you always do — by backing up what Windows contains in your Start menu folder. With all the changes in the startup variety over the years, the way the startup menu folder is opened has changed from version to version.
Organizing the All Apps collection in Windows 10 is a little more complex than in previous versions. So be sure to read our guide. One big difference should be noted: Windows 10 uses an internal database to create a list of all apps on the Start menu. This means that the folder will not display all the contents of the Start menu, but only classic desktop applications. You won’t see any apps downloaded from the Store or Windows, so you can control Use them elsewhere.
RELATED: How to organize and add shortcuts to a specific list of all apps in Windows 10
Recommended: Fortect
Are you tired of your computer running slowly? Is it riddled with viruses and malware? Fear not, my friend, for Fortect is here to save the day! This powerful tool is designed to diagnose and repair all manner of Windows issues, while also boosting performance, optimizing memory, and keeping your PC running like new. So don't wait any longer - download Fortect today!

Another thing to be aware of is Windows, which builds your home navigation from two places. A folder of system-wide folders and shortcuts appears in the Start menu for each logged on user. There is a user-specific folder that contains raw edges and only appears for the currently logged in user. If you’ve ever installed an app and had the choice to install it for the current user only or for all users, that definitely means. These two folders are undoubtedly combined to create items that anyone can see on the Start menu.
Windows 7 and 10: Open the Start Menu folder by viewing it in File Explorer
Swipe in from the right edge of each screen and choose Settings> Change PC Settings. Select Privacy> Webcam. Disable Use my webcam apps or disable them for specific apps.
You can usually navigate to your system’s startup folder in File Explorer. Just launch it and go to one of the following rental locations (tip: you can copy these locations, but paste theminto the file location explorer pane).
Here is the location of each global startup folder for each user bit:
C: ProgramData Microsoft Windows Start Menu
And here is the exact storage location of the personal startup folder for the logged in user with options:
% appdata% Microsoft Windows Start Menu
Note that the actual % appdata% variable is simply a faster way to navigate to most of the AppData Roaming folder in your user file structure.
So, if for some reason you want to organize a user’s home directory different from the one you are currently logged in to, you can simply navigate to the same location in their human folder. For example, if the owner’s account name is “John”, you can navigate to the following location:
C: Users john AppData Roaming Microsoft Windows Start Menu
-Click on the “Start” button. – Now find “Camera” or usually “Camera” and select it. -You can now access the webcam from your computer. Hope it helps you.
And if you find yourself using these folders on a regular basis, create additional shortcuts for them to make them even easier to find in the future.
Windows 7: Right-click the All Programs folder in the yu “Start”
In Windows XP, you only had to right-click to navigate to a folder, but Windows 7 changed the idea. In Windows 7, when you right-click on the center of the menu, you just get a generic Open Windows Explorer plane that takes you to the Libraries view.
Instead, click the Start button to open all menus, right-click the All Programs option, and then select Open to navigate to your personal custom menu folder. You can also click Open All Users to open the system-wide Startup folder, which will apply to all users.
Now you can have fun organizing your Start menu. Remember, Windows 10 doesn’t give you as much organizational flexibility as it used to, but there is still a lot you can do.
Download this software and fix your PC in minutes.The startup folder for all users is located here in the following path: C: ProgramData Microsoft Windows Start Menu Programs StartUp.
Introduction.1 Click Start → All Programs.2 Right-click the Startup folder and select Open.3 Right-click Start and select Open Windows Explorer.4 Find the program you want to start when Windows starts, and if necessary, drag it to the Startup folder.
Windows 7, Start Menu -> Run, type “webcam” or “camera” and someone should see the camera-related software that came with your computer. Click the software and …
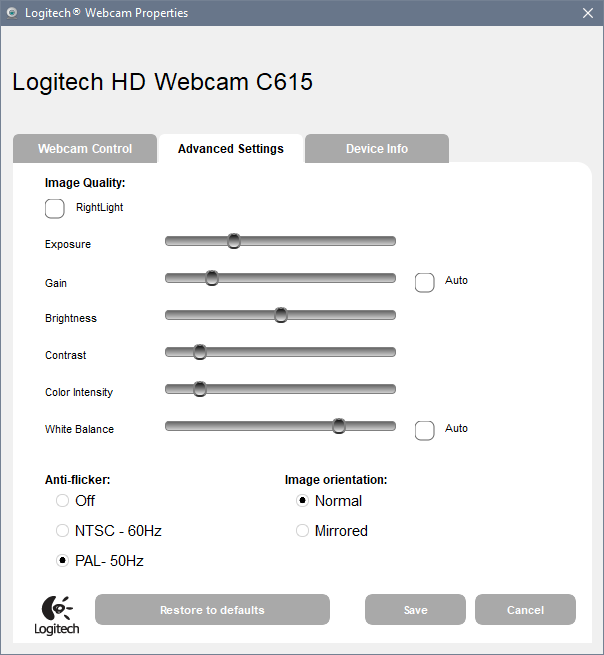
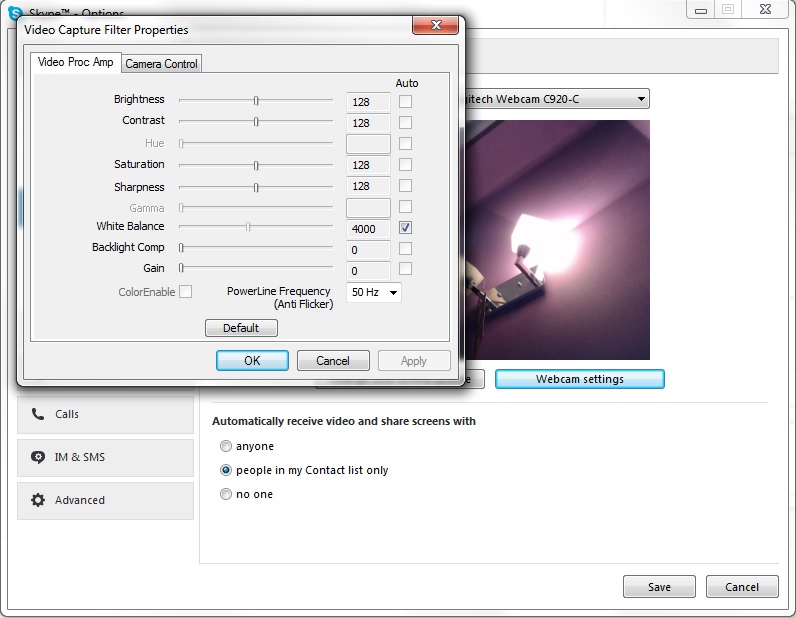
1. Webcam settings allow you to improve parameters such as exposure time, comparison, saturation and white balance temperature of your webcam, be it the built-in iSight camera, the new FaceTime / FaceTime HD camera, or an external USB webcam. 2.
Webcam Einstellungen In Windows 7
Webbkamerainstallningar I Windows 7
Nastrojki Veb Kamery V Windows 7
Configuracoes Da Camera Da Web No Windows 7
Webcamera Instellingen In Windows 7
Windows 7의 웹 카메라 설정
Configuracion De La Camara Web En Windows 7
Impostazioni Della Webcam In Windows 7
Ustawienia Kamery Internetowej W Systemie Windows 7
Parametres De La Camera Web Dans Windows 7