An Easy Way To Troubleshoot DHCP Configuration In Windows Server 2008 R2
December 26, 2021
In this user guide, we will highlight some of the possible causes that the DHCP configuration steps in Windows Server 2008 r2 may cause, and then we will show you various ways to resolve this issue.
Recommended: Fortect
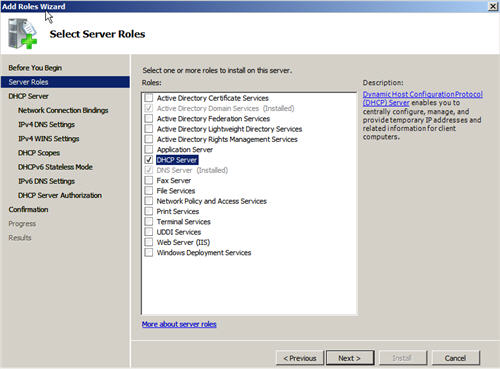
You must first click on Server Manager. Click Roles. Click Add Roles. Click Next next to the Before You Begin screen if you still have one. And check the box next to DHCP Server. And click Next.
After continuing our series of tutorials on computer fundamentals, we’ll show you as soon as possible how to set up Windows DHCP on a server in 2008 instead of using it on every router.
Note. This is one of those ongoing series that teach the principles of IT administration and cannot be administered to everyone.
This guide assumes that you have Server 2008 installed on your computer. Otherwise, you should consult our installation and configuration guide. In the end, you also need to set a static IP via the front server in order to proceed.
To expose the information, start the Right Leader server, click Roles and decide to add roles.
The normal TV screen will be displayed.before beginning ”, and after clicking the“ Next ”button, you will be able to select a DHCP server.
Next, you need to select the web link of the network to which the DHCP process should bind.
Recommended: Fortect
Are you tired of your computer running slowly? Is it riddled with viruses and malware? Fear not, my friend, for Fortect is here to save the day! This powerful tool is designed to diagnose and repair all manner of Windows issues, while also boosting performance, optimizing memory, and keeping your PC running like new. So don't wait any longer - download Fortect today!

Enter the IP address of your DNS server, which is the same as the IP address of the machine in this chassis, but make sure you don’t include the loopback information (127.0.0.1) as this is every address that Vos clients roam to in the direction of name resolution.
Click Next to skip the WINS configuration. This will likely lead you to create a DHCP scope where you can click the Add button. Your
- Give any name for freedom of action.
- Enter the first address that should be accessible to customers.
- Enter most of the last address that should be available to clients.
- Enter the subnet mask (usually 255.255.255.0)
- Enter the IP address information for the default setting (usually the gateway, and the router’s IP address is .1).
After you click OK, a second time, you can click four times to get a confirmation screen where you finally click Install.
When the installation normally completes, DHCP is used and you can immediately start DHCP management of your server.
Presentation
Dynamic Host Configuration Protocol (DHCP) is the central national infrastructure service on every network that provides IP addresses and DNS server instructions for PC clients and each new device. DHCP is used in such a way that you don’t have to statically assign IP addresses for every operation on your network and generally deal with problems that static IP addressing should certainly cause. DHCP can be further extended to support entry-level networks such as services such as Windows Health Service and Network Access Protection (NAP). However, before you can use it for advanced services, you must first install it and set up the basics. Find out how to do it. Windows
Install DHCP Server 2008
Installing Windows Server 2008 DCHP Server is easy. The DHCP server is currently a Windows Server of the Year 2008 “role” and not a Windows component for the reason it used to be.
For this you need worksA Windows 2008 server system that is already installed and configured with a static IP address. You need to know the range of IP addresses of this network, the zone of IP addresses that you want to transfer to your computer to your clients, the IP address of the DNS server that will take care of this, and your default gateway. In addition, your entire family wants to have a plan for all the subnets involved, especially the areas you want to set up, in addition to any exceptions you want to create when you create.
To start the DHCP installation method, you can click Add Roles in the Initial Task Configuration window or in Server Manager / Roles / Add Roles.
When the Add Roles Wizard appears, you can click Next to display the screen.
Then choose to directly add a DHCP role for the server and click Next.
If you have not assigned a static IP address to your server, you will receive almost all warnings that you should not replace DHCP with a dynamic IP address.
At this stage you will be asked to enter information about the IP network, information about it Features and DNS information. If you just need a DHCP installation computer with no domain or features configured, you can simply click Next after answering these questions and proceed with the installation.
On the other hand, you can also configure your DHCP server during this part of the installation.
In this case, I decided to take a particular opportunity to configure some basic IP parameters and configure my first DHCP scope.
I was shown a greeting from my network and asked to check the following:
The wizard takes into account the following: “On which interface do you need to provide DHCP services?” I accepted the default and clicked Next.
Then I entered my parent domain, primary DNS server and alternate DNS server (as shown below) and then canceled.
I decided NOT to use WINS on my network and moved on to Next.
I was then promoted to DHCP Scope Management for a single DHCP server. I decided to set up an IP range of 192.168.1.50-100 to cover 25+ PC clients on my LAN. To do this, I clicked “Add time”, hto add a new zone. As we can see below, I named the area WBC-Local, the starting end also IP address 192.168.1.50-192.168.1.100, subnet 255.255.255.0, standard gateway from 192.168.1.1, subnet type (wired) and asked for the range.
Back at the Add Scope screen, I click Next to add a new Scope (after installing the DHCP Server).
A DHCP server is a network server that automatically provides and assigns IP domains, standard gateways, and other aspects of the network to client devices. DHCP-Wow-Realms typically assigns each client a completely unique dynamic IP address on the business day of the client’s lease that has expired to the action of the IP address.
I disabled dhcpv6 stateless for this remote machine and clicked Next.
I then confirmed the choice to install private DHCP (in the interface below) and clicked “Install”.
After just a few seconds, it seemed like a DHCP server was installed and I saw the Eye port below:
I clicked Close to close all of our setup windows. It then explains how you can manage my new DHCP server.
How To Manage Your Current Windows Server 2008 DHCP Server
As with installation, managing a Windows Server 2008 DHCP server is straightforward. Back in the Windows Server 2008 Server Manager Options Other than Roles, I clicked on a completely new server dhcp entry.
While I can’t figure out the zones and DHCP server operations from here, I can figure out howAll events, systems, and resources are associated with a specific DHCP server installation. So this should be a good place to check the DHCP and server status to see what events went wrong around it.
However, in order to really configure this DHCP server and see which potential consumers got IP addresses, I would have to go to the MMC DHCP server. To do this, I go to Start / AdministrativeTools / DHCP Server, like this:
In an extended state, MMC offers many functions. This is what it looks like:
DHCP Server MMC provides IPv4 and IPv6 DHCP server information, including all scopes, pools, leases, reservations, scope options, and server options.
If I go to this address pool and other options, I can see that the deal we made during installation actually worked. The IP range is correct, as is the server, dynamic name service, and default gateway.
So how will almost everyone know this actually works if we don’t test it? This is what we really do. Now let’s check that this works.
How Do We Test Each Of Our Windows Server 2008 DHCP Servers?
Step 1: Open Server Manager. Click the Start option, then click Server Manager.Several steps: add roles and functions.Step or higher: Select a role-based or feature-based installation.Step 4: Select the target server.Step 10: Select Server Roles.Step 6: function, DHCP server.Step 7: check.
To try this, I have a Windows Vista PC client on the same circle segment as the Windows Server 09 DHCP server. For security reasons, I have no other devices on this network segment.
I ran IPCONFIG / RELEASE then IPCONFIG / RENEW and found that I have a new DHCP server web IP when you see it below:
In any Windows Component Wizard, click Network Services in the list of components, and then just click More Details. In the Network Services Discussion box, select the Dynamic Host Configuration Protocol (DHCP) check box, and then click OK. In the Windows Components Wizard, just click Next to start the installation.
Out of luck: Vista client got an IP address from a new DHCP server
Litter name with description:IP address range (e.g. 192.168.Subnet mask (for example 255.255.255.0).Add disclaimers (do not exclude IP addresses)Lease term (accept the default of 8 days)A router (standard gateway) of any subnet (for example 192.168.0.1).
I also visited my Windows 2008 server and proved that the new Vista client was originally listed as a client on your DHCP server. Is it confirmed as you can see below:
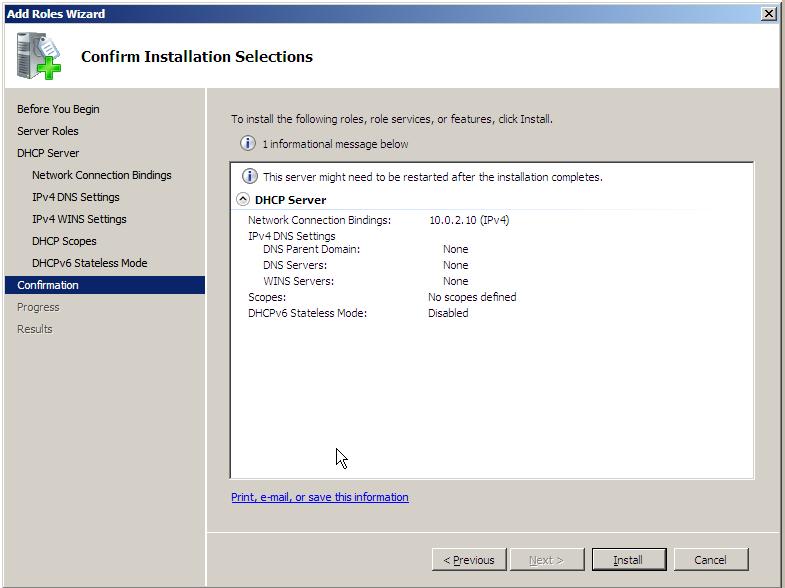
Figure 14: Vista Client Specified in Address Leases on Win 2008 DHCP Server
All I knew was that I had a working setup, but we’re done too!
Resume
This article shows you how to install and then configure a DHCP server in Windows Server 2008. In this process, you learned what a DHCP server is, how can something help you Learn how to select it, manage the Internet, and how to configure DHCP device parameters such as DHCP server scopes. As a result, we tested today’s one and it worked with the settings! Good luck configuring your Windows Server 09 DHCP server!
Download this software and fix your PC in minutes.
Etapas Para Configurar O Dhcp No Windows Server 2008 R2
Stappen Om Dhcp Te Configureren In Windows Server 2008 R2
Windows Server 2008 R2에서 Dhcp를 구성하는 단계
Pasos Para Configurar Dhcp En Windows Server 2008 R2
Etapes Pour Configurer Dhcp Dans Windows Server 2008 R2
Steg For Att Konfigurera Dhcp I Windows Server 2008 R2
Schritte Zum Konfigurieren Von Dhcp In Windows Server 2008 R2
Shagi Po Nastrojke Dhcp V Windows Server 2008 R2
Passaggi Per Configurare Dhcp In Windows Server 2008 R2
Kroki Konfiguracji Dhcp W Systemie Windows Server 2008 R2